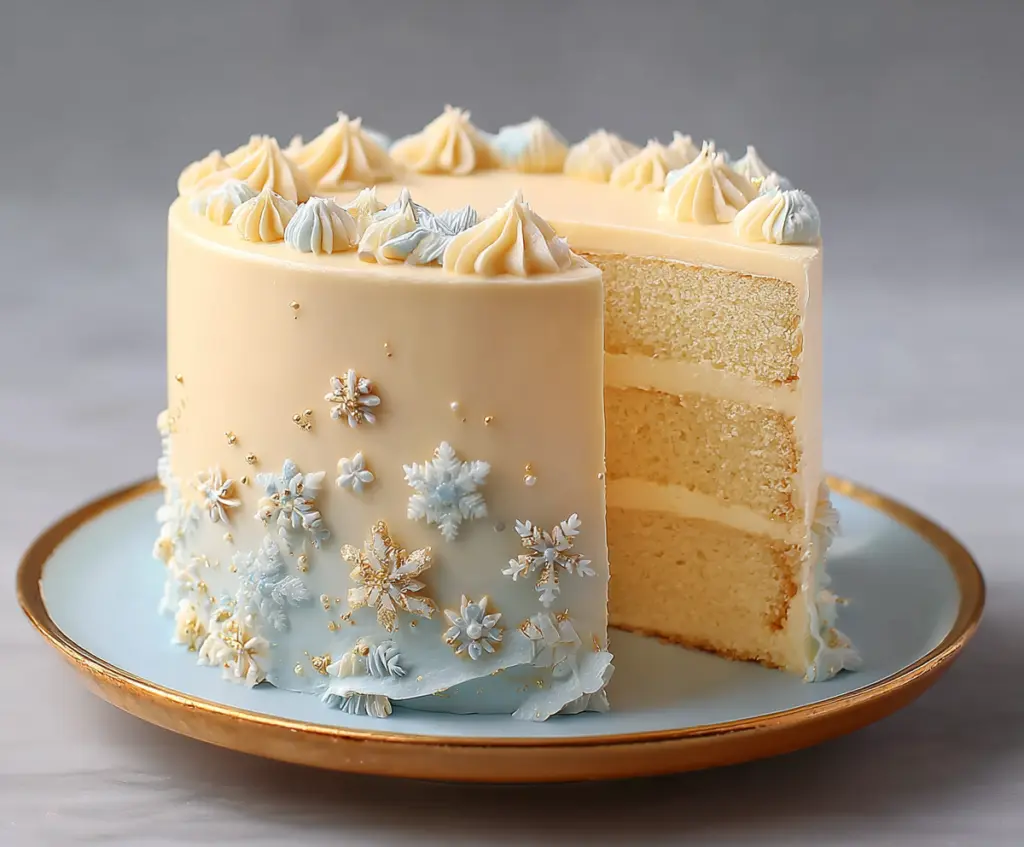
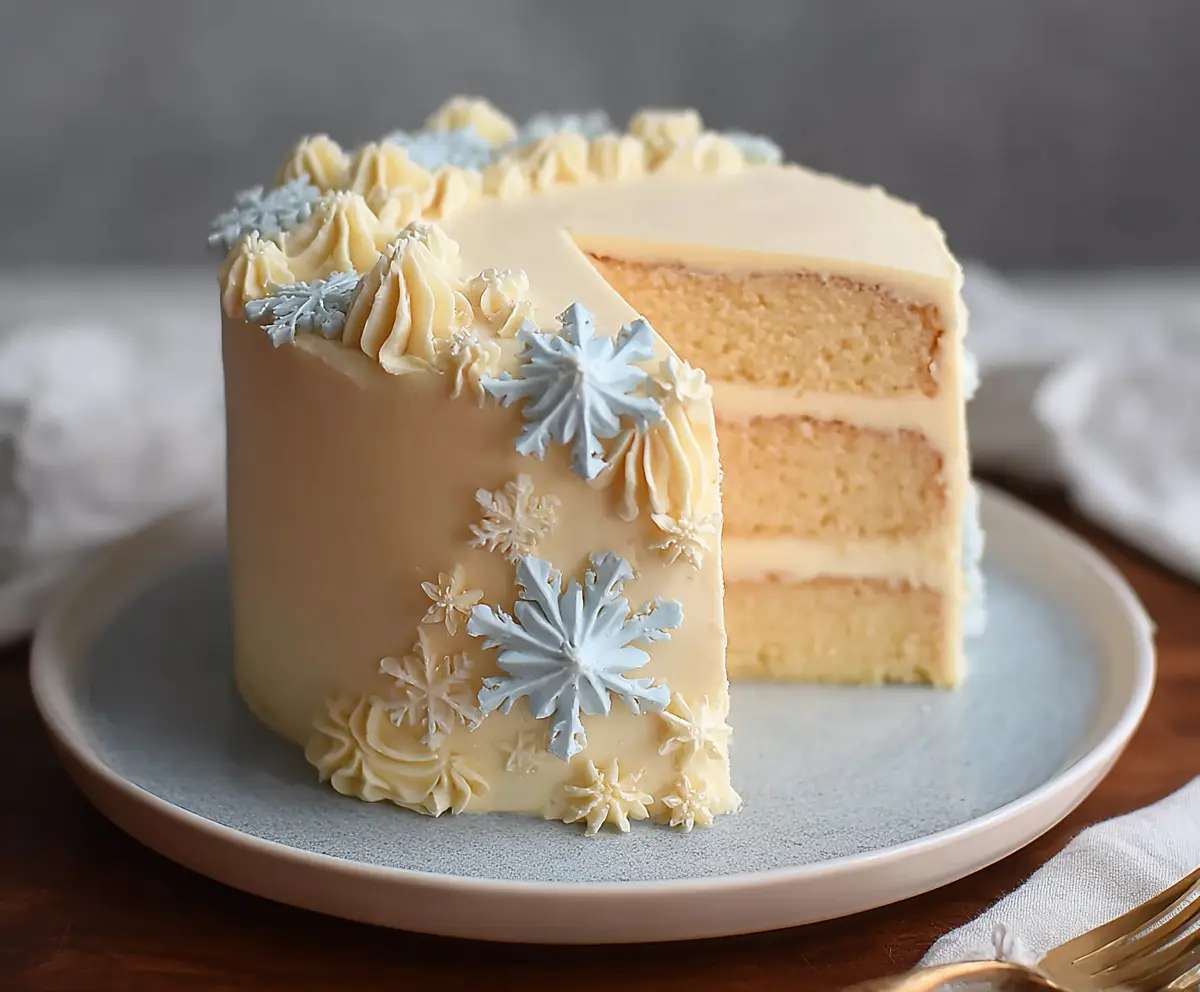
Winter Vanilla Snowflake Cake is a delightful treat that feels like a little piece of snowy magic on your plate. It’s a soft vanilla cake layered and topped with fluffy white frosting, all decorated with delicate snowflake shapes that bring the cozy winter season to mind. This cake looks as lovely as it tastes—perfect for celebrating chilly days with a sweet touch.
I love making this cake when the air turns crisp and the world outside is dressed in white. It’s one of those desserts that instantly brightens up the room and makes everyone smile. The vanilla flavor is gentle but satisfying, and the snowflake decorations add a fun and festive twist that feels just right for holiday gatherings. Plus, I find that the cake stays wonderfully moist, which is always a win in my book.
When I serve this cake, I like to pair it with a warm cup of tea or hot chocolate. It’s also a great centerpiece for a winter party or a simple family dinner. Watching friends and family’s faces light up as they enjoy the sweet, snowy feel of the cake is one of my favorite moments. If you want to add a little extra charm, sprinkle a bit of powdered sugar on top to mimic fresh snow—easy and beautiful!
Key Ingredients & Substitutions
Vanilla Extract: This is the heart of the cake’s flavor. Use pure vanilla for the best taste, but if you’re out, a good-quality imitation vanilla works fine too.
Butter: Unsalted butter is ideal so you can control the saltiness. You can swap with margarine, but the flavor and texture might change a bit.
Milk: Whole milk keeps the cake moist and tender. If needed, you can substitute with buttermilk or a non-dairy milk like almond milk for a lighter twist.
Powdered Sugar: Sifted powdered sugar is key for a smooth, creamy buttercream. If you don’t have powdered sugar, you can make your own by blending granulated sugar until fine.
Royal Icing or Fondant: These bring the snowflake decorations to life. If you want a quicker option, store-bought edible snowflake decorations work well too.
How Can You Make Smooth Frosting and Perfect Cake Layers?
Getting your frosting silky and your cake layers even is key to a great-looking cake. Here’s how I do it:
- For Frosting: Beat softened butter until creamy before adding sugar. Add powdered sugar gradually, and don’t rush—beat until fluffy. Use cream a tablespoon at a time to reach the right consistency.
- For Cake Layers: Grease and flour pans well so the cakes come out clean. Divide batter evenly using a scale or scoop. Bake at steady temperature; a toothpick test tells you when they’re ready.
- Crumb Coat: Applying a thin layer of frosting seals in crumbs and sets the surface. Chill the cake after this step to make applying the final coat much easier.
Equipment You’ll Need
- Three 8-inch round cake pans – perfect for even layers that stack well.
- Electric mixer or stand mixer – makes beating butter and eggs easy and smooth.
- Mixing bowls – for combining your dry and wet ingredients separately.
- Rubber spatula – great for folding batter without deflating it.
- Offset spatula – helps spread and smooth frosting evenly.
- Piping bags and star tip – for making pretty buttercream dollops on top.
- Cooling racks – so your cake layers cool evenly and don’t get soggy.
Flavor Variations & Add-Ins
- Add almond extract instead of vanilla for a nutty, rich twist that pairs well with winter.
- Mix in a cup of fresh or frozen blueberries into the batter for a fruity surprise inside.
- Stir in finely grated lemon zest for a fresh citrus flavor that brightens the vanilla.
- Swap snowflake decorations for edible silver stars or winter-themed sprinkles for a different look.
Winter Vanilla Snowflake Cake
Ingredients You’ll Need:
For the Vanilla Cake:
- 2 ½ cups (315g) all-purpose flour
- 1 tbsp baking powder
- ½ tsp salt
- 1 cup (227g) unsalted butter, softened
- 1 ¾ cups (350g) granulated sugar
- 4 large eggs, room temperature
- 1 tbsp pure vanilla extract
- 1 cup (240ml) whole milk, room temperature
For the Vanilla Buttercream Frosting:
- 1 cup (227g) unsalted butter, softened
- 4 cups (480g) powdered sugar, sifted
- 2 tsp pure vanilla extract
- 3-4 tbsp heavy cream or milk
- Pinch of salt
For Decoration:
- White and pale blue royal icing or fondant for snowflakes
- Edible gold paint or dust for accents
- Small edible pearl decorations (optional)
How Much Time Will You Need?
This cake takes about 20 minutes to prepare, 25-30 minutes to bake each cake layer, plus 30 minutes to chill after the crumb coat. Decorating time varies depending on your snowflake designs, but plan for around 1 hour total. Overall, expect approximately 3 hours from start to finish, including cooling and decorating.
Step-by-Step Instructions:
1. Prepare the Cake Layers:
Preheat your oven to 350°F (175°C). Grease and flour three 8-inch round cake pans. In a bowl, sift together the flour, baking powder, and salt. In a separate large mixing bowl, beat the softened butter with sugar until the mixture is light and fluffy, about 4-5 minutes. Add the eggs one at a time, beating well after each addition, then stir in the vanilla extract. Gradually add the flour mixture and milk alternately to the batter, starting and ending with the flour mixture. Mix just until combined.
Divide the batter evenly between the pans and smooth the tops. Bake for 25-30 minutes, or until a toothpick inserted in the center comes out clean. Let the cakes cool in the pans for 10 minutes, then turn them out onto wire racks to cool completely.
2. Make the Vanilla Buttercream:
Using an electric mixer, beat the softened butter on medium speed until creamy. Gradually add sifted powdered sugar one cup at a time, beating well after each addition. Stir in the vanilla extract, salt, and 2 tablespoons of heavy cream. Beat on high speed for 3-5 minutes until the frosting becomes light and fluffy. Add additional cream if needed to reach the perfect spreadable consistency.
3. Assemble the Cake:
Place one cake layer on your serving plate and spread an even layer of buttercream over the top. Repeat with the remaining layers. Next, apply a thin crumb coat over the entire cake to seal in any crumbs. Chill the cake in the fridge for about 30 minutes to set the crumb coat.
Once chilled, frost the cake smoothly with the remaining buttercream, using an offset spatula for best results.
4. Decorate with Snowflakes:
Pipe or attach delicate white and pale blue snowflakes made from royal icing or fondant along the sides of the cake. Add small touches of edible gold dust or paint accenting the snowflake centers for a magical winter sparkle. Optionally, scatter small edible pearl decorations around to mimic glistening snow. Finally, pipe small dollops of vanilla buttercream around the top edge with a star tip for a finishing touch.
5. Final Touches:
Chill the cake until you’re ready to serve to let the frosting set firmly. For the best flavor and texture, let the cake sit at room temperature for about 20 minutes before slicing and serving.
Enjoy your beautiful Winter Vanilla Snowflake Cake — a moist, soft vanilla cake with creamy frosting and sparkling snowflake decorations that will bring cozy winter magic to your table!
Can I Use Frozen Cake Layers for This Recipe?
Yes, you can bake the cake layers ahead of time and freeze them wrapped tightly in plastic wrap and foil. When ready to use, thaw them overnight in the fridge and bring to room temperature before frosting and assembling.
How Should I Store Leftover Cake?
Store leftover cake in an airtight container at room temperature for up to 2 days or in the fridge for up to 5 days. Let refrigerated cake come to room temperature before serving for the best flavor and texture.
Can I Substitute Milk in the Cake Batter?
Absolutely! You can substitute whole milk with buttermilk, almond milk, or any other milk alternative. Just keep in mind that it might slightly change the flavor and texture.
What’s the Best Way to Make Snowflake Decorations?
Try using royal icing or fondant for snowflake decorations. You can pipe them with icing or cut shapes out of fondant using small snowflake cutters. Edible gold dust adds an elegant touch—just use a fine brush to apply it gently.